
By Sacha Nacar
Torrey Searle and I participated in the TADHack mini hackathon in London this past weekend and we discovered some pretty cool things…
Everybody loves Slack, there’s no denying it – we even tried mashing it up with our own APIs. However, what Slack lacks is the same ‘openness’ in voice/video communication. Yes it has cool webhooks, and a slick API but it lacks something. Torrey and I discovered this ‘something’ while working on our hacks using the Cisco Spark APIs.
Cisco Spark is essentially the same product as Slack but the great thing about it is that each room gets assign a SIP URI!
What better way than a quick tutorial to satiate all the VoIP geeks reading this – we’re going to hook up our WebRTC SDK to a CiscoSpark chatroom! I swear, it takes less than 10 minutes!
Things you’re going to need in advance:
- A Voxbone account enabled for WebRTC use (with your Voxbone WebRTC service credentials)
- A Voxbone test number, also enabled for WebRTC use and linked to a working SIP URI.
- A WebRTC secret key
- A CiscoSpark account and a chat room with more than 2 users.
- NodeJS installed on your machine with a little previous knowledge of NodeJS and ExpressJS (as I won’t go into how to set it up or start a skeleton ExpressJS app).
Setting up your CiscoSpark Room and SIP URI
- This part is probably the easiest, you just need to start a conversation with 3 or more people in CiscoSpark and grab the ID of the room that hides within the URL (whatever comes after “rooms/”).
![]()
- Now navigate to the CiscoSpark developer’s website and go to the Get Room Details endpoint documentation: or click here and don’t forget to sign in.
- You now should see what looks like a mini web-sandbox for API calls.
- Enable “Test Mode” in the right hand corner.
- Paste your Room ID into the RoomID field.
- In the Query parameters, set the showSipAddress to “true”.
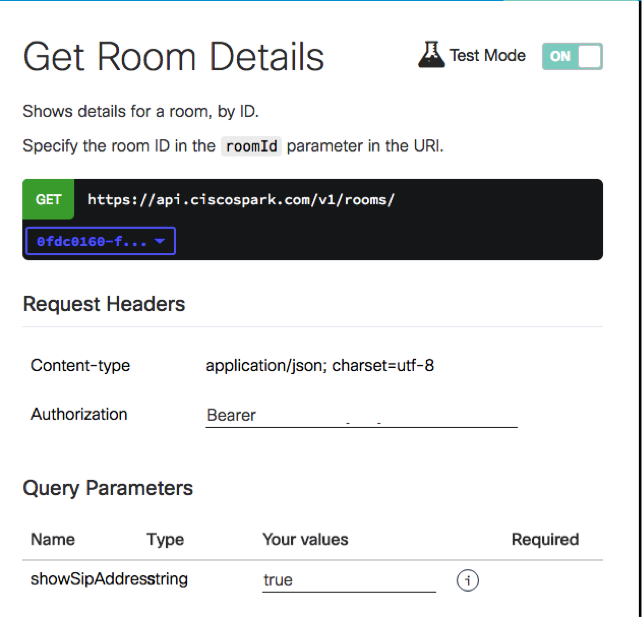
- Run! (Click “run”, don’t actually get up and start running randomly).
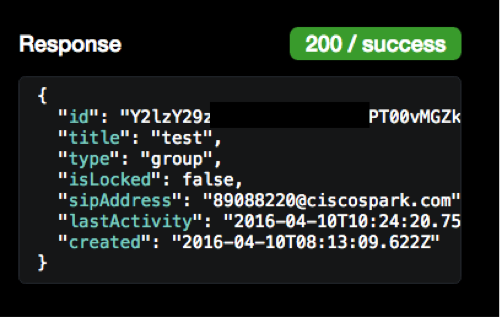
- The response will give you a SIP address for the room, in this case “89088220@ciscospark.com”
- We now essentially have a SIP endpoint for our Voxbone WebRTC-SIP SDK!
Setting Up your Voxbone DID
If you are a new Voxbone customer you might be unfamiliar with how you can configure your Voxbone numbers. You can also follow this how-to guide as well: How to create and configure a SIP URI
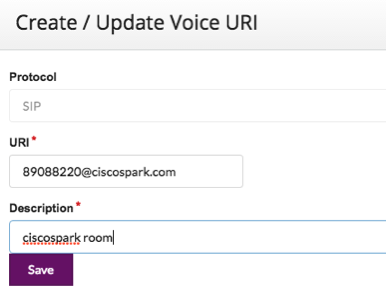
- Navigate to your Voxbone account and under “Configure”, select Voice URIs.

- Click on “New” to create a new URI using your CiscoSpark room URI.
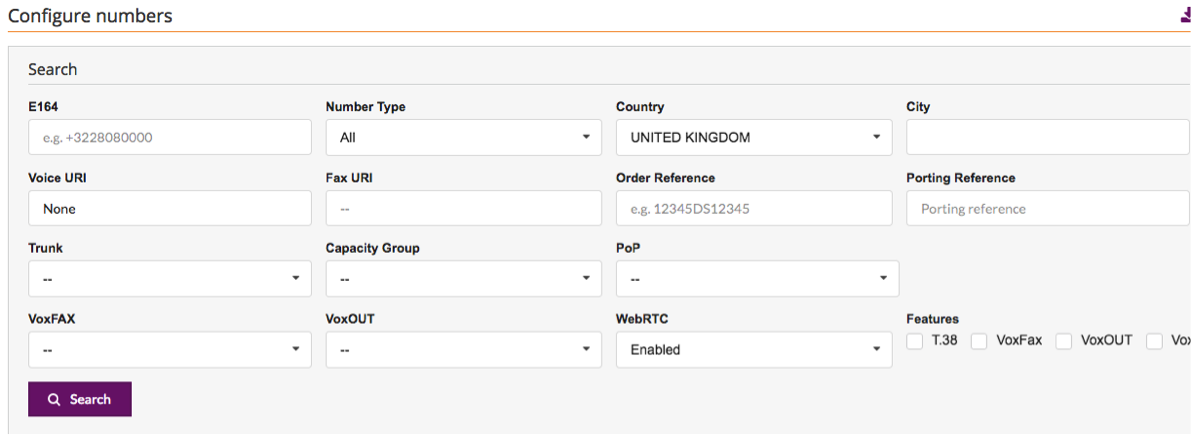
- Now navigate to Configure > Configure Numbers
- You can use the search tool to look for a number that is not yet assigned to a SIP URI and is WebRTC enabled.
- When you have your DID, enable DNS SRV on it (under the Service tab)

- Now you can assign your voice URI to this number (under the Voice tab) by selecting and applying your newly created CiscoSpark URI.
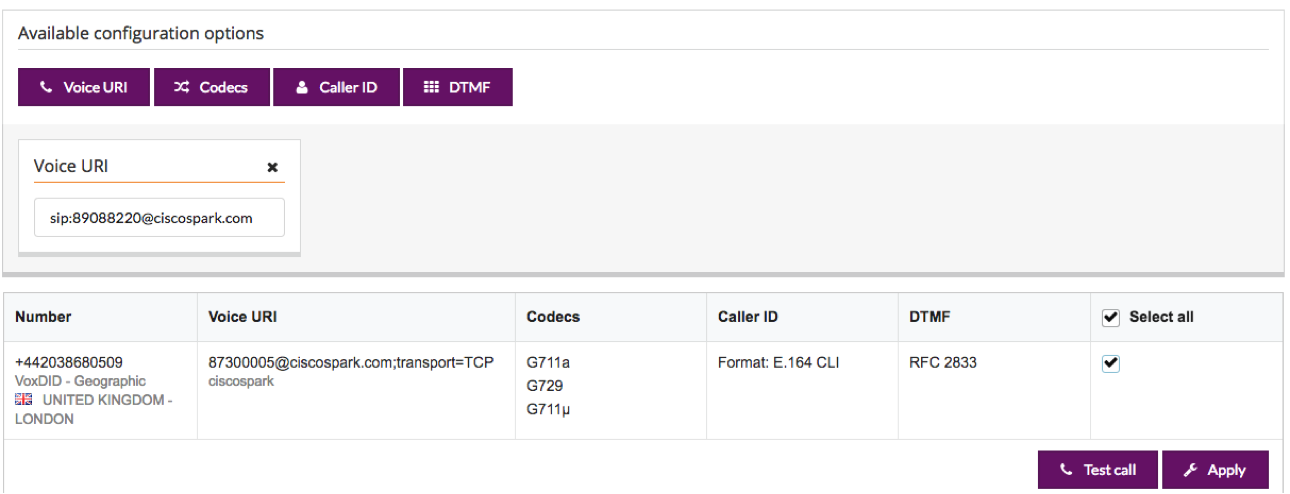
- Now you can use the “Test Call” button to make sure your CiscoSpark room rings!
Setting Up the Voxbone WebRTC-SIP SDK
If you don’t know how to do that by now, shame on you! Just kidding…
I’ll lightly go over the steps but you can find A LOT of information down here:
- Voxbone WebRTC-SIP Docs
- Voxbone WebRTC-SIP Get Started
- Guide to discovering Voxbone’s WebRTC SDK 2.0
- WebRTC SDK FAQ
- Testing our WebRTC SDK Easily
- WebRTC-SIP Starter Apps
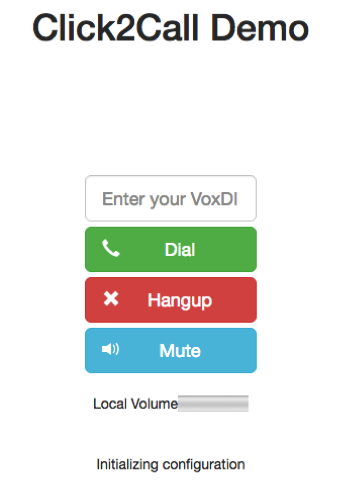
For now, we will simply download our NodeJS starter app from Github and modify a few things.
- Navigate to Github and download the NodeJS WebRTC Starter App.
- Follow the instructions on the README.md file and add your WebRTC credentials
- Run the app and navigate to http://localhost:3000
- You can now input your Voxbone number in the input box and call it!
That’s it! Easy right? The great thing with all this is that now, you can integrate both voice and messages (and video with a little bit of tweaking) to your web app for some really rich communication. Now take this demo along with all the resources and create the communication applications of your dreams!